CEDO - Installation and experimentation tutorial

Links

coda

ns-3-dce
ns-3
ccnx

Updates

last updated 01/23/2013

Nota: CEDO is the new name of the CODA algorithm. The source code still uses the old name CODA, so don't be surprised!

Prerequisites

Building/running CEDO (or CODA) has been tested on (X)Ubuntu 12.04(10). systems.

Make sure you have all required packages installed to work with ns-3 and ccnx.
More inforamtion can be found here: ns-3 ccnx

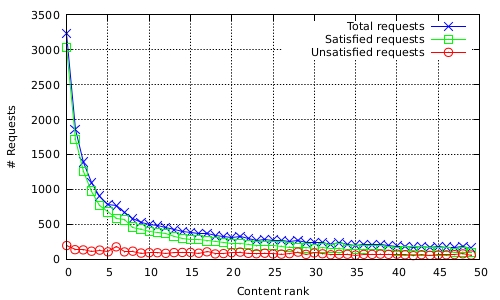
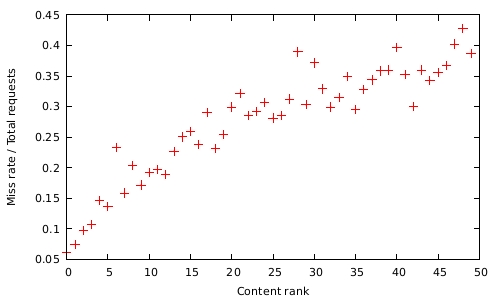
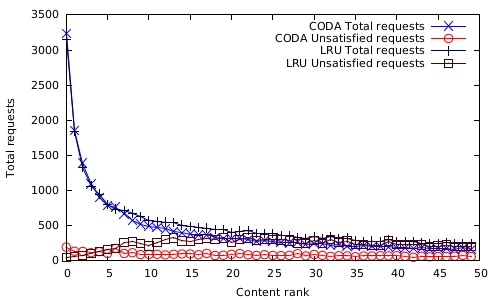
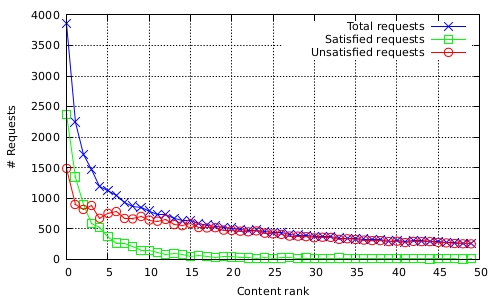
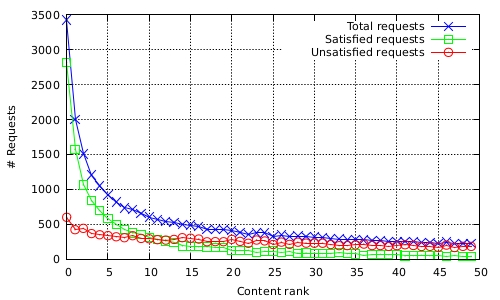
You can run for example following command in a terminal (not all packages are required here):

$ sudo apt-get install make ant autoconf libssl-dev libexpat-dev libpcap-dev \
libecryptfs0 libxml2-utils automake gawk gcc g++ git-core pkg-config libpcre3-dev \
openjdk-6-jre-lib python python-dev mercurial bzr gdb valgrind gsl-bin libgsl0-dev \
libgsl0ldbl tcpdump libxml2 libxml2-dev

Build CEDO

To build CEDO check out the git repository coda.

$ git clone https://github.com/bertl4398-2/coda.git

Go to the coda/workspace/ccnx-0.6.0 directory and build ccnx.

$ cd <path_where_coda_is>/coda/workspace/ccnx-0.6.0
$ ./build.sh

Go to the coda/workspace directory and run the build.sh script for ns-3-dce.

$ cd <path_where_coda_is>/coda/workspace
$ ./test_build_coda/ns-3-dce/utils/build.sh

Run simulations

To run simulations run the start.sh script provided in the coda/workspace directory.

$ cd <path_where_coda_is>/coda/workspace
$ ./start.sh

To change the simulation parameters follow the explanations in the script provided.

!! The simulations can take up to several hours (4h, 5h, ...) !!

All results are written to /tmp/testcoda__<timestamp> by default and removed after the simulation.
You can change the path and folder in the start.sh script and disable the deletion.

!! The folder can exceed 2 GB for one simulation !!

Make sure you have all necessary write permissions on your system

The simulation run is logged in the simulation_<timestamp>.txt file.

The combined results are writen to the data_<timestamp>.csv file.

Reproduce results presented

To reproduce the results presented in the paper, you can set the specified parameters as described next.

These parameters are to be set in the start.sh script file.

Finally you can plot the combined data_*.csv file's data for example with gnuplot

Plots shown here were obtained by averaging over the values of 10 independent runs, simulation time 4,000s.

To change the mobility pattern, you can always set the parameter TRACE to "random" (random direction) or $PWD/rwdata.ns_movements (generated SLAW trace) or the path to any other compatible trace file.

NODES=50
PUB_PER_NODE=1
REQ_PER_NODE=15
BSIZE=11
ZIPF="0.8"
WIDTH=500
TIME_CHANGE=2
TTL=30
IR_PERIOD=0
HELLO_PERIOD=1000000
PIT_DELAY=500000
SPEED="2"
TXGAIN=-14
RXGAIN=-10
TRACE="random"
ccnxMode=2
Constant unsatisfied requestsLinear growing missrate
NODES=50
PUB_PER_NODE=1
REQ_PER_NODE=15
BSIZE=11
ZIPF="0.8"
WIDTH=500
TIME_CHANGE=2
TTL=30
IR_PERIOD=0
HELLO_PERIOD=1000000
PIT_DELAY=500000
SPEED="2"
TXGAIN=-14
RXGAIN=-10
TRACE="random"
ccnxMode=2

(CEDO)
NODES=50
PUB_PER_NODE=1
REQ_PER_NODE=15
BSIZE=11
ZIPF="0.8"
WIDTH=500
TIME_CHANGE=2
TTL=30
IR_PERIOD=0
HELLO_PERIOD=1000000
PIT_DELAY=500000
SPEED="2"
TXGAIN=-14
RXGAIN=-10
TRACE="random"
ccnxMode=0

(LRU)
Requests for LRU and CEDO
NODES=50
PUB_PER_NODE=1
REQ_PER_NODE=15
BSIZE=11
ZIPF="0.8"
WIDTH=500
TIME_CHANGE=2
TTL=30
IR_PERIOD=0
HELLO_PERIOD=1000000
PIT_DELAY=500000
SPEED="2"
TXGAIN=-15
RXGAIN=-15
TRACE="random"
ccnxMode=2
Reduced transmission range with random direction
NODES=50
PUB_PER_NODE=1
REQ_PER_NODE=15
BSIZE=11
ZIPF="0.8"
WIDTH=500
TIME_CHANGE=2
TTL=30
IR_PERIOD=0
HELLO_PERIOD=1000000
PIT_DELAY=500000
SPEED="2"
TXGAIN=-15
RXGAIN=-15
TRACE=$PWD/rwdata.ns_movements
ccnxMode=2
Reduced transmission range with SLAW