Header


Index

  - How it works?
  - How to use Bake
  - Some small examples
  - Modules description

How it works?    <  top >


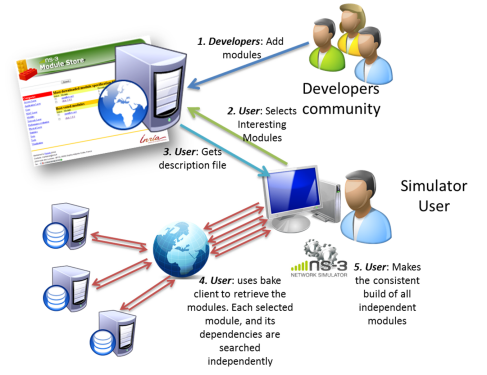
From the point of view of Bake users, there are two steps to fulfill for using the tool. First, it is necessary to access to a server, in order to download a customized configuration file, with specifies all the modules the user is interested in.  The client side will be responsible for downloading the required modules and dependencies, and building the module, and dependencies, in the right order.

Bake Flow
We have two target users for Bake:
   - Developers: Who will contribute with modules descriptions to the server side
   - Simulator users: Who are interested on use the simulator and some specific modules

Intended flow:
1. Developers:  add the meta data describing their modules, e.g. who developed, what it does, where to find it, which tool to use to make the build...
2. Simulator Users: select the modules they have interest into
3. Simulator Users: download the description file into their own machines
4. Simulator Users: use the client bake to download the selected modules, and its dependencies, directly to their machines
5. Simulator Users: use the client bake to make a consistent, adapted to their architecture and reproducible build of ns-3 and the selected modules

Already installed ns-3 versions:
   When the user is installing a new module Bake will search for already installed versions of ns-3 on the user's path and on the default installation directory (for .rmp and .deb installations). If Bake finds any already installed version, it verifies two things, first the present installation is compatible with the requirements of the target module. Second, if the user has the right to install modules within that specific repository. If the versions are compatible, and the user has the rights, Bake will install the new module on the found repository. If not, there is no pre-installed version or the user has no writing permissions, Bake downloads all the dependencies and builds them on the specified build directory. Of course the users can choose to ignore any installed version and make a new clean installation every time.

   This part of Bake is not implemented yet and in fact it is still quite open. We would REALLY welcome inputs from the community about how it would be the best way to handle pre-existent installations.

How to use Bake
  <  top >


Prerequisites:
  - Python 2.7, or higher
  - The target tools for each specific repository/build tool you will try to use
* It is important to notice that you only NEED to have installed the tools you will use. For example, If you will try to build packages that uses mercurial as repository you need to have mercurial installed, if you will download a zip, all in one kind of file, you need to have zip installed. The same for the build tools, if you will build a module that relies, for example, on Cmake, you need to have Cmake installed. If you will not use the tool, you don' t need to have it installed on your machine.

          
Download:
  The most recent version of the client bake can be found at:    http://code.nsnam.org/daniel/bake/
    - hg clone http://code.nsnam.org/daniel/bake


Full description file:
  For now, just use the bakeconf.xml file that came with the client bake, so that you have a taste of what the client can do.
* This file  will work, some how, as the server for you. It has a description of a series of modules that can be already build with the bake client.  When the real server will be ready, one will be able to download the customized file, the one just after the configuration.

Some small examples
  <  top >


Here we will present some simple bake used cases. For now, bake is only linux compatible, the $ means the prompt into a linux machine, and what comes next is the command that should be executed.
 
To install:
   $ hg clone http://code.nsnam.org/daniel/bake
   $ cd bake


Options :
   $ python bake.py --help
 Usage: bake.py [options] command [command options]

Where command is one of:
  install      : Downloads the configured modules AND makes the build in one step
  configure    : Setup the build configuration (source, build, install directory, and per-module build options) from the module descriptions
  reconfigure  : Update the build configuration from a newer module description
  download     : Download all modules enabled during configure
  update       : Update the source tree of all modules enabled during configure
  build        : Build all modules enabled during configure
  clean        : Cleanup the source tree of all modules built previously
  shell        : Start a shell and setup relevant environment variables
  uninstall    : Remove all files that were installed during build
  show         : Report on build configuration
  show-builtin : Report on builtin source and build commands

To get more help about each command, try:
  bake.py command --help

Options:
  -h, --help            show this help message and exit
  -f CONFIG_FILE, --file=CONFIG_FILE
                        The Bake file to use. Default: bakefile.xml.
  --debug               Should we enable extra Bake debugging output ?


Simple install with the file from the bake server
    > Thanks to Gustavo Carneiro for the suggestion. 

  
python bake.py [-f <configuration file>]  install
        -  Downloads and makes the build

   Examples:
   $ python bake.py -f bakeServerConfigFile.xml install
  
To install one module:
    python bake.py [-f <configuration file>] configure -c bakeconf.xml [-e <name of the target module>]
        -  Creates a configuration file, by default called bakefile.xml, that has all the required information to download and build the target module

    python bake.py [-f <configuration file>] download
        -  Downloads the module, and its dependencies, to a directory called source

    python bake.py [-f <configuration file>] build
        -  Builds the modules into a directory called build

    Examples:
    - To install, for example, open flow
   $ python bake.py configure -c bakeconf.xml -e openflow-ns3
   $ python bake.py download
   $ python bake.py build

    - To install, ns-3 dev
   $ python bake.py -f nsfile.xml configure -c bakeconf.xml -e ns-3-dev
   $ python bake.py -f nsfile.xml download
   $ python bake.py -f nsfile.xml build


To install ALL modules: 
     Warning!!!! This will take some time :)
   
    python bake.py [-f <configuration file>] configure -c bakeconf.xml -a
        -  Creates a configuration file, by default called bakefile.xml, that has all the required information to download and build ALL the available modules

    python bake.py [-f <configuration file>] download
        -  Downloads the modules, and its dependencies, to a directory called source

    python bake.py [-f <configuration file>] build
        -  Builds the modules into a directory called build

    Example:
    - To install,  all the modules available on the bakeconf.xml file
   $ python bake.py configure -c bakeconf.xml -a
   $ python bake.py download
   $ python bake.py build

Modules description
  <  top >


Bake is prepared to handle the most popular building and version control tools. However, to enable bake to automatically build the modules one needs to provide a description of the target module in a format bake can handle.  This description should precisely describe the tools used in the module development, its dependencies and where bake can find a copy of the code. When using the server side, the module store, this file will be provided automatically. However, if one want to add an entry to the server, or want to create a module description to personal use, it is important to know how the module description is made.

Here we will present the format of the description file and all the available options to configure the module build process. 

Configuration file format:
 <configuration>
       <modules>
           <module name="NameOfTheModuleToBuild">
                      <source type="SourceRepositoryType">
                       <attribute name="url" value="WhereToFindTheSourceCode"/>
                       <attribute name="module_directory" value="NameOfTheTargetRepository"/>
                 </source>

                 <depends_on name="ModuleNameThatThisModuleDeppendsOn" optional="False"/>
                 <depends_on name="AnotherModuleThisModuleDeppendsOn" optional="True"/>

                 <build type="BuildToolType" objdir="build">
                      <attribute name="configure_arguments" value="Configuration parameters to pass to the build tool"/>
                 </build>

           </module>
           <module name="ModuleNameThatThisModuleDeppendsOn">
                .....
           </module>     
           <module name="AnotherModuleThisModuleDeppendsOn">
                .....
           </module>     
      </modules>
 </configuration>

Module tag:
  The module tag describes the module name, this name is used to identify the module. The module tag may contain the following sub tags:
  • name: The name of the target module. This name is the one that should be referenced by other nodes to define the dependencies
  • source: Where to find the source code for the target module     
  • build: information on with tool use to build the source code and the options should be used to build and install the target module
  • depends_on: any dependencies the target module may have regarding other defined modules

Source sub-tag:
  The source stores the information related to where to find the source code for the target module.
    The available source tag options are:
  • type: type of the tool used to store the source of the target module.
    The valid types are:  archive, bazaar, cvs, git, inline, mercurial and system_dependency
  • archive: We should use this method when the source files are available through a single downloadable file. The acceptable extensions for the single file are: tar, tar.gz, tar.Z, tar.bz2, rar and zip
    The available options of the archive tag are: 
      • module_directory*: local directory where the source code will be stored (optional)
      • url: web address that should be used to recover the source code (mandatory)
      • extract_directory*: local directory where the code from the single file will be extracted  (optional)

      • Example:

      <source type="archive">
          <attribute name="url" value="http://downloads.sourceforge.net/project/pygccxml/pygccxml/pygccxml-1.0/pygccxml-1.0.0.zip"/>
          <attribute name="module_directory" value="$SRCDIR/forced_newDirName"/>
      </source>
  • bazaar: The source files are available through a Bazaar source code repository.
    The available options of the bazaar tag are: 
      • module_directory*: local directory where the source code will be stored (optional)
      • url: web address that should be used to recover the source code (mandatory)
      • revision: if the stable code is accessible through a stable revision, if unspecified the newest code on the repository is used  (optional)
      • Example:
<source type="bazaar">
    <attribute name="url" value="https://launchpad.net/pybindgen"/>
    <attribute name="revision" value="revno:809"/>
</source>
  • cvs: The source files are available through a CVS (Concurrent Versions System) source code repository.
    The available options of the cvs tag are: 
      • module_directory*: local directory where the source code will be stored (optional)
      • root: repository root specification to checkout from (mandatory)
      • module: name of the module to checkout (mandatory)
      • checkout_directory:  Name of directory to checkout to, If unspecified, the name of the module being checked out will be used  (optional)
      • date: define the stable release date that should be used to checkout the code, if unspecified the newest code is used (optional)

      • Example:
<source type="cvs">
    <attribute name="root" value=":pserver:anoncvs:@www.gccxml.org:/cvsroot/GCC_XML"/>
    <attribute name="module" value="gccxml"/>
    <attribute name="date" value="2009-09-21"/>
</source>

  • git: The source files are available through a git source code management repository.
    The available options of the git tag are: 
      • module_directory*: local directory where the source code will be stored (optional)
      • url: web address that should be used to recover the source code (mandatory)
      • revision: if the stable code is accessible through a stable revision, if unspecified the newest code on the repository is used  (optional)

      • Example:

<source type="git">
    <attribute name="url" value="git://git.kernel.org/pub/scm/linux/kernel/git/davem/net-next.git"/>
    <attribute name="revision" value="fed66381d65a35198639f564365e61a7f256bf79"/>
</source>

  • mercurial: The source files are available through a mercurial (hg) source code management repository.
    The available options of the mercurial tag are: 

      • module_directory*: local directory where the source code will be stored (optional)
      • url: web address that should be used to recover the source code (mandatory)
      • revision: if the stable code is accessible through a stable revision, if unspecified the newest code (tip) on the repository is used  (optional)

      • Example:

<source type="mercurial">
    <attribute name="url" value="http://code.nsnam.org/ns-3-dev"/>
    <attribute name="revision" value="49dadc40be43"/>
</source>
  • system_dependency: Some modules may have dependencies that are related to the system itself and these dependencies have no  publicly available source source code. Thus it is not possible to download and build such dependencies.  For these cases bake enables a system_dependency source type that can be used to check if the dependency is met in the target system. Bake may even try to automatically install the missing software if the user uses one of the most popular Linux versions (Ubuntu, Debian, Fedora, Suse, redhat or centos). Of course, to be successful,  the binaries have to be available through the user's configured package manager repositories. 
    The available options of the system_dependency tag are: 

      • module_directory*: local directory where the source code will be stored (optional)
      • dependency_test: the name of the binary that the module depends on. One can test either the presence of a single binary file e.g. "bash", or can use more  elaborate Boolean expressions, e.g. "((program1 or program2) and program3)", meaning that at least one of the two program1 or program2  should exist on the system AND that program3  should also exist (mandatory)
      • try_to_install: if bake should try to install the missing piece of software or not (mandatory)
      • more_information: a explanation message that will be shown to the user if the dependency is not met and it is not possible to install automatically the missing software (mandatory)
      • name_yum: name of the software over yum repositories, if not defined the dependency_test will be used (optional)
      • name_apt-get: name of the software over apt-get repositories, if not defined the dependency_test will be used (optional)
      • name_yast: name of the software over yast repositories, if not defined the dependency_test will be used (optional)

      • Example:

<source type="system_dependency">
    <attribute name="dependency_test" value="(qmake or qmake-qt4)"/>
    <attribute name="try_to_install" value="True"/>
    <attribute name="name_yum" value="qt4-devel"/>
    <attribute name="name_apt-get" value="qt4-dev-tools"/>
    <attribute name="more_information" value="Didn't find QT 4, download and install it from http://qt.nokia.com/downloads/"/>
</source>
      * $SRCDIR, $OBJDIR, $INSTALLDIR tags may be used by the developer to reference local directories, on the user's machine, that will store, respectively, the source code, the object code and where the build code should be installed.
 
Build sub-tag:
  The build sub-tag stores the information related to the tools used to build the source code and about the module installation process  .
    The available build tag options are:


        Options valid for all available building methods
  • objdir: if module supports object dir to be different from the src dir, by default it is no (optional)  
  • patch*: code to the patched, if any, before proceeding with the build (optional)
  • pre_installation*: UNIX Command to run before the installation  (optional)
  • post_installation*: UNIX Command to run after the installation (optional)
  • supported_os: the names of the operating systems supported by the building. e.g: linux, darwin, cygwin. If undefined all systems should be supported (optional)
  • v_LD_LIBRARY: Directory, or directories separated by a ";", to be append to the  LD_LIBRARY environment variable (optional)
  • v_PATH: Directory, or directories separated by a ";", to be append to the PATH environment variable (optional)
  • v_PKG_CONFIG: Directory, or directories separated by a ";", to be append to the PKG_CONFIG environment variable (optional)
         Available building methods: autotools, cmake, inline, make, python, waf
  • autotools:  Building process uses autotools building tool
    The available options of the autotools tag are:
      • CC: C compiler to use (optional)
      • CXX: C++ compiler to use (optional)
      • CFLAGS: Flags to use for C compiler (optional)
      • CXXFLAGS: Flags to use for C++ compiler (optional)
      • LDFLAGS: Flags to use for Linker (optional)
      • maintainer: Maintainer mode (mandatory)
      • configure_arguments: Command-line arguments to pass to autotools configuration (optional)
      • Example:
<build type="autotools" objdir="yes">
    <attribute name="configure_arguments" value="../configure --enable-userlevel --disable-linuxmodule --enable-nsclick --enable-wifi"/>
</build>        
  • cmake:  Building process uses autotools building tool
    The available options of the cmake tag are:
      • CC: C compiler to use (optional)
      • CXX: C++ compiler to use (optional)
      • CFLAGS: Flags to use for C compiler (optional)
      • CXXFLAGS: Flags to use for C++ compiler (optional)
      • LDFLAGS: Flags to use for Linker (optional)
      • build_arguments: Targets to make before install (optional)
      • configure_arguments: Command-line arguments to pass to the cmake configuration (optional)
      • cmake_arguments: Command-line arguments to pass to the cmake building  (optional)    
      • Example:
<build type="cmake" objdir="yes">
    <attribute name="CC" value="/external/bin/gcc-3.4"/>
    <attribute name="CFLAGS" value="-g"/>
</build>        
  • inline:  Build using an python method. Sometimes complex that it is quite hard, if not impossible, to use "standard" building methods. In these, hopefully, rare cases it is easier to just create a small program to perform whole building process and forget about it. If this is your case bake allows you build  your module.       
      • Code: Python code used to build the source code (mandatory)
      • Example:
<build type="inline"  classname="NscModuleBuild">
    <attribute name="supported_os" value="linux;linux2"/>
    <code>class NscModuleBuild(InlineModuleBuild):
    def __init__(self):
        InlineModuleBuild.__init__(self)
    def build(self, env, jobs):

        env.run(['python', os.path.join(env.srcdir, 'scons.py'),
                 '-j', str(jobs), 'prefix=' + env.installdir, 'install'],
                directory=env.srcdir)
    def clean(self, env):
        env.run(['python', os.path.join(env.srcdir, 'scons.py'), '-c'],
                directory=env.srcdir)
    def check_version(self, env):
        return True</code>
</build>

  • make:  Builds the module using the standard make building tool
    The available options of the make tag are:
      • LDFLAGS: Flags to use for Linker (optional)
      • build_arguments: Targets to make before install (optional)
      • configure_arguments: Command-line arguments to pass to the make configuration (optional)
      • make_arguments: Command-line arguments to pass to the make building (optional)      
      • Example:
<build type="make" objdir="yes">
    <attribute name="pre_installation" value="cd $SRCDIR;qmake NetAnim.pro or cd $SRCDIR;qmake-qt4 NetAnim.pro or cd $SRCDIR;qmake -spec macx-g++ NetAnim.pro"/>
    <attribute name="make_arguments" value="install PREFIX=`pwd`/../build"/>

</build>        
  • python:  Performs the build for python based projects
    The available options of the make tag are:       
      • Example:
<build type="python">
    <attribute name="patch" value="$SRCDIR/patchs/hotfix32.patch"/>
</build>        
  • waf:  Performs the build for Waf based projects
    The available options of the waf tag are:
          • CC: C compiler to use (optional)
          • CXX: C++ compiler to use (optional)
          • CFLAGS: Flags to use for C compiler (optional)
          • CXXFLAGS: Flags to use for C++ compiler (optional)
          • LDFLAGS: Flags to use for Linker (optional)
          • build_arguments: Targets to waf before install (optional)
          • configure_arguments: Command-line arguments to pass to the waf configuration (optional)
      • Example:
<build type="waf" objdir="yes">
    <attribute name="configure_arguments" value="configure"/>
    <attribute name="build_arguments" value="--generate-version"/>
</build>        
* $SRCDIR, $OBJDIR, $INSTALLDIR tags may be used by the developer to reference local directories, on the user's machine, that will store, respectively, the source code, the object code and where the build code should be installed.
depends_on sub-tag:
  The depends_on sub-tag makes it explicit the dependencies of the target module over other defined modules, these other modules should also be defined in the description file.  

 The dependency may be optional or not. Optional dependencies means that the module "softly" depends on the other module, i.e. It would be good to have, but if something happens the module will work without the dependency. For example, ns-3 has optional dependencies on many modules, e.g. openflow, however, if the user does not use openflow, there is no need to install it. Thus, if something happens during the building process of these optional dependencies the whole building process does not stop. On the other hand, if there is a problem during the compilation of a non optional dependency, that means the module, that is really needed, will not be ready to be used by the module. In this case, if the dependency is not met, the building process is aborted.
  • Example 1:

 <module name="ns-3">
      <source type="mercurial">
          <attribute name="url" value="http://code.nsnam.org/ns-3-dev"/>
      </source>

      <build type="waf" objdir="yes">
          <attribute name="configure_arguments" value="configure --prefix=$INSTALLDIR --enable-examples --enable-tests --with-nsclick=$INSTALLDIR --with-pybindgen=$SRCDIR/../pybindgen --with-openflow=$SRCDIR/../openflow-ns3 --with-nsc=$SRCDIR/../nsc"/>
      </build>

      <depends_on name="net_anim" optional="True"/>
      <depends_on name="nsc" optional="True"/>
      <depends_on name="pybindgen" optional="True"/>
      <depends_on name="click" optional="True"/>
      <depends_on name="openflow-ns3" optional="True"/>

  </module>

  • Example 2:

  <module name="qt4">

      <source type="system_dependency">
          <attribute name="dependency_test" value="(qmake or qmake-qt4)"/>
          <attribute name="try_to_install" value="True"/>
          <attribute name="name_yum" value="qt4-devel"/>
          <attribute name="name_apt-get" value="qt4-dev-tools"/>
          <attribute name="more_information" value="Didn't find QT 4, download and install it from http://qt.nokia.com"/>
      </source>

      <build type="none" objdir="no">
      </build>
   </module>

  <module name="net_anim">
      <source type="mercurial">
          <attribute name="url" value="http://code.nsnam.org/netanim"/>
      </source>

      <build type="make" objdir="no">
          <attribute name="pre_installation" value="cd $SRCDIR;qmake NetAnim.pro or cd $SRCDIR;qmake-qt4 NetAnim.pro or cd $SRCDIR;qmake -spec macx-g++ NetAnim.pro"/>
      </build>
      <depends_on name="qt4" optional="False"/>
  </module>


Mantained by Planete group
Contacts: Daniel.Camara@inria.fr
2004 route des Lucioles - BP 93, 06902 Sophia Antipolis Cedex, France
Tel. : +33 (0) 4 89 73 24 29


Powered by:
inria logo